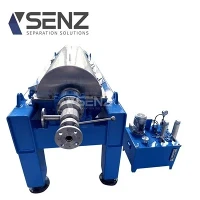

Hey there! I'm a supplier of small decanter centrifuges, and today I'm gonna walk you through how to replace the worn-out parts in a small decanter centrifuge. Whether you're a newbie or a pro, this guide will help you keep your centrifuge running smoothly.
Understanding the Small Decanter Centrifuge
Before we jump into the replacement process, let's have a quick look at what a small decanter centrifuge is and how it works. A small decanter centrifuge is a piece of equipment used to separate solids from liquids or different liquids from each other based on their density differences. It's widely used in various industries, such as Oil Water Separator, Sand & Gravel Washing Water Treatment, and Gluten Wheat Flour Separator.
The centrifuge consists of several key parts, including the bowl, the screw conveyor, the drive system, and the bearings. Over time, these parts can wear out due to continuous use, friction, and exposure to harsh chemicals. When that happens, it's important to replace the worn-out parts to ensure the centrifuge's performance and longevity.
Identifying the Worn-Out Parts
The first step in replacing the worn-out parts is to identify them. Here are some common signs that indicate a part needs to be replaced:
1. Unusual Noise
If you hear strange noises coming from the centrifuge, such as grinding, rattling, or squealing, it could be a sign of a worn-out bearing, a loose screw, or a damaged bowl.
2. Vibration
Excessive vibration is another indicator of a problem. It could be caused by an imbalance in the bowl, a worn-out drive belt, or a misaligned screw conveyor.
3. Reduced Performance
If the centrifuge is not separating the solids and liquids as effectively as it used to, it could be due to a worn-out screw conveyor, a clogged bowl, or a malfunctioning drive system.
4. Leakage
Leakage of liquids or solids from the centrifuge is a clear sign of a problem. It could be caused by a damaged seal, a cracked bowl, or a loose connection.
Once you've identified the worn-out parts, it's time to gather the necessary tools and replacement parts.
Gathering the Tools and Replacement Parts
Before you start the replacement process, make sure you have the following tools:
- Socket wrenches
- Screwdrivers
- Pliers
- Hammer
- Torque wrench
- Grease gun
You'll also need to purchase the replacement parts. Make sure you get the right parts for your specific centrifuge model. You can usually find the part numbers in the centrifuge's manual or by contacting the manufacturer.
Replacing the Worn-Out Parts
Now that you have the tools and replacement parts, it's time to start the replacement process. Here's a step-by-step guide on how to replace some of the most common worn-out parts:
1. Replacing the Bearings
The bearings are one of the most critical parts of the centrifuge. They support the rotating parts and reduce friction. Over time, the bearings can wear out and need to be replaced.


- Step 1: Turn off the centrifuge and disconnect it from the power source.
- Step 2: Remove the access panel to gain access to the bearings.
- Step 3: Use a socket wrench to remove the bolts that hold the bearing housing in place.
- Step 4: Carefully remove the old bearings from the housing.
- Step 5: Clean the bearing housing and apply a thin layer of grease to the new bearings.
- Step 6: Install the new bearings in the housing and tighten the bolts.
- Step 7: Reinstall the access panel.
2. Replacing the Screw Conveyor
The screw conveyor is responsible for transporting the solids from the bowl to the discharge port. Over time, the screw conveyor can wear out and need to be replaced.
- Step 1: Turn off the centrifuge and disconnect it from the power source.
- Step 2: Remove the access panel to gain access to the screw conveyor.
- Step 3: Use a socket wrench to remove the bolts that hold the screw conveyor in place.
- Step 4: Carefully remove the old screw conveyor from the centrifuge.
- Step 5: Install the new screw conveyor in the centrifuge and tighten the bolts.
- Step 6: Reinstall the access panel.
3. Replacing the Drive Belt
The drive belt is responsible for transferring power from the motor to the centrifuge. Over time, the drive belt can wear out and need to be replaced.
- Step 1: Turn off the centrifuge and disconnect it from the power source.
- Step 2: Locate the drive belt and use a pair of pliers to loosen the tensioner.
- Step 3: Remove the old drive belt from the pulleys.
- Step 4: Install the new drive belt on the pulleys and adjust the tensioner.
- Step 5: Reconnect the centrifuge to the power source and test it.
4. Replacing the Seals
The seals are responsible for preventing leakage of liquids and solids from the centrifuge. Over time, the seals can wear out and need to be replaced.
- Step 1: Turn off the centrifuge and disconnect it from the power source.
- Step 2: Remove the access panel to gain access to the seals.
- Step 3: Use a screwdriver to remove the bolts that hold the seal housing in place.
- Step 4: Carefully remove the old seals from the housing.
- Step 5: Clean the seal housing and apply a thin layer of sealant to the new seals.
- Step 6: Install the new seals in the housing and tighten the bolts.
- Step 7: Reinstall the access panel.
Testing the Centrifuge
After replacing the worn-out parts, it's important to test the centrifuge to make sure it's working properly. Here's how to do it:
- Step 1: Reconnect the centrifuge to the power source.
- Step 2: Turn on the centrifuge and let it run for a few minutes.
- Step 3: Check for any unusual noises, vibrations, or leakage.
- Step 4: Monitor the performance of the centrifuge to make sure it's separating the solids and liquids effectively.
If you notice any problems during the test, stop the centrifuge immediately and check the parts again.
Conclusion
Replacing the worn-out parts in a small decanter centrifuge is not as difficult as it may seem. By following the steps outlined in this guide, you can keep your centrifuge running smoothly and extend its lifespan. If you have any questions or need further assistance, don't hesitate to contact us. We're here to help you with all your centrifuge needs.
If you're interested in purchasing a small decanter centrifuge or need replacement parts, feel free to reach out to us for a consultation. We'll be happy to discuss your requirements and provide you with the best solutions.
References
- Manufacturer's manual for the small decanter centrifuge
- Industry best practices for centrifuge maintenance and repair